Youth Volleyball Drills Examples - Volleyball Peppering
Explore youth volleyball drills - volleyball peppering drills. New ways to pepper.
Most volleyball teams pepper in practice.
Let’s think about it for a second. Is it teaching players any skills which are needed in the match?
Youth Volleyball Drills - Pros and Cons of Volleyball Peppering
Pros of pepperingOK, peppering is a reasonable way to warm up for example in the match where the space and time are usually very limited.
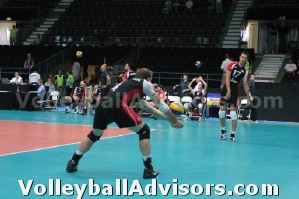 Most volleyball teams pepper for warm ups
before the match.
Cons of peppering
In practice some coaches have stopped doing it – because it really doesn’t teach the passing, setting and spiking skills what you need in the game. It just teaches you to pepper.
That’s what we did – we stopped peppering in practice. It was the best solution ever.
How we can do volleyball peppering better?
Let’s see how we can do peppering better...
- We could hit the ball over the net – just like in the match.
- We could put opponents to the other side of the net – just
like in the
match.
- We could be passing ball to our teammates – just like in the match.
Youth Volleyball Drills - Volleyball Peppering Over the Net
Example 1 – Peppering Over the Net - Half Court - 3 on 3 or 2 on 2
Divide the volleyball court half. 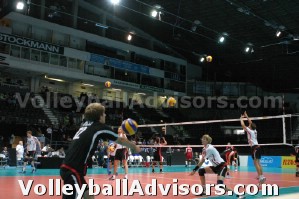 Traditional 1 on 1 peppering - is there a better way?
Form 2 or 3 player teams in the same side of the net.
Teams pass-set-hit the ball to the other side of the net. We prefer to
rotate players after each contact, so they all learn to pass, set and
spike.
Practice Flow
- A player starts by serving (or tossing) the ball over the
net.
- The receiving team passes, sets and spikes to return the
ball.
- The spiker aims the ball toward defending player who digs the ball up to the setter – and the rally continues as long as the players are able to keep the ball flying.
Make sure players focus on the ball control and keeping the really
going.
 (1)
Servers serve to the serve receivers.
(1)
Servers serve to the serve receivers.
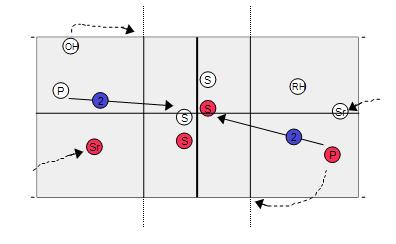
Drill Details
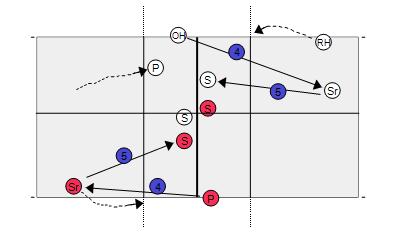
White Teams - 3 on 3 on the half court (upper one in the
picture).
Red Teams 2 on 2 on the other half (lower one in the picture).
(1) Servers serve (or toss) the ball over the net to the passer on the
other side.
(2) Serve Receivers pass the ball to the setter.
 (2)
Serve receivers pass to setters
(2)
Serve receivers pass to setters
Outside hitters (OH in white and P in red) start moving to the position from which they start the approach when the setter releases the ball.
(3) Setters release the ball to the outside hitter.
 (3)
Setters set to the outside hitters.
(3)
Setters set to the outside hitters.
Right back defenders on position 1 (RH in white and Sr in red) move to defend the line.
P in the white team who plays on the left back position moves closer to cover the attack of OH.
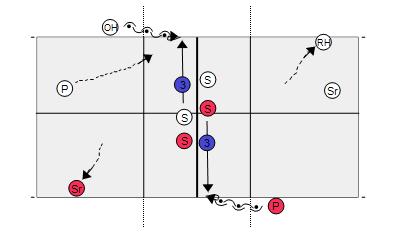
(4) Outside hitters spike the ball to the line defenders.
 (4)
Outside hitters spike to defenders who dig to the setters.
(4)
Outside hitters spike to defenders who dig to the setters.
And the rally goes on.
(If beginning players find it difficult to place the ball to the line, defender could move towards the middle of the court - to keep the rally going longer.)
(5) Defenders dig the ball to the setter.
Right side hitters (Sr in the red and RH in the white) start moving to the position to start their approach when the setter releases the ball.
Important!
Remember to keep the drill as game-like as possible.
Require players to set front row set next to antennae on both sides – which means the other team is hitting outside and the other one right side.
Keep the defenders on the same positions as when playing in the big court – line defender near the side line and middle back defender near own playing position.
Push hitters to do good approach after the pass – and focus on timing on each set.
Example 2: Youth Volleyball Drills - The setter starts on position 1
You may also want your setter to run in (from position 1) when serve receiving or defending – if you don’t have the other team using the other half of the court.Example 3: Youth Volleyball Drills – Spiking Behind 10 feet line (3 meter line)
One way to keep rallies longer is to make hitters spike behind 10 feet (3 meter) line.Example 4: Youth Volleyball Drills - Keep the game simple for beginning volleyball players!
If you start the practice with this drill, you may want to have players set or bump the ball over the net with the third contact – until players are warm enough to spike.Setting the ball over with the third contact is a recommended way to do this peppering drill, if the players are not able to control and aim their spikes.
If players cannot spike the ball over you could require a jump set or tip with the third contact.
Take a look at similar drills at.... LINK coming up
Like this page:


